 In this review we will analyze the HyperX T1 DDR3 Kit (KHX1600C9D3T1K2/8G) produced by Kingston, a 8GB kit (2 4096MB modules) with a frequency of 1600 MHz CL9.Although they are part of Kingston flagship memory series, in this case they are dedicated to users less demanding in terms of performance and that prefer cheap memories.
Kingston was founded in October 17, 1987 and is one of the main memory manufacturers of the world. Kingston can meet every needs, offering a choice between over 2000 different data storage products.In 2007 the company reached 4.5 billion dollars in sales and was considered by Fortune magazine's one of the 100 best companies to work for in America, mainly due to the relationship that exists between the various actors and to the atmosphere present in the company.
![]()
In addition to RAM, the company produces SSDs, flash memories and other data storage media. Its products are appreciated by enthusiast users and by overclockers. In this latter area, in fact, Kingston currently holds the record of frequency reached by a memory module, an impressive 3293 MHz obtained with a Kingston HyperX kit cooled by liquid nitrogen.
The kit we will review belongs to the T1 series, but unlike the other kits in this series, does not offer particularly high overclocking performance.Instead, the kit will be appreciated for their 8GB capacity at a very low price.
Overview
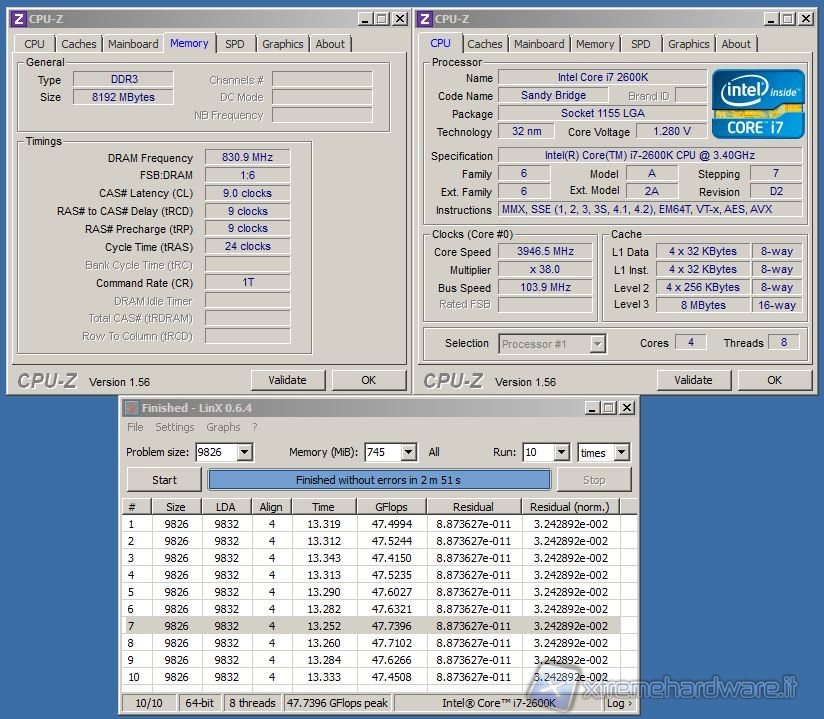
We specify that the test of the Kingston HyperX T1 kit was performed on a Sandy Bridge platform with P67 chipset.We remind the reader that within this architecture Intel has abandoned the uncore denomination (anything that is not core), which also included the L3 cache in Nehalem, in favor of System Agent, which is practically a NorthBridge integrated into the CPU. The System Agent is responsible for managing the memory controller, with reduced latencies compared to the memory controller of Clarkdale CPUs and comparable only to those of Lynnfield CPUs.The main novelty of Sandy Bridge architecture is the presence of a memory multiplier that can be set to 13.3x, 16x, 18.6x and 21.3x, meanwhile the BCLK frequency is almost fixed to 100 MHz. The variability of the base clock in overclocking is very low and the frequencies of memories in Sandy Bridge will therefore remain almost fixed around the standard values of 1333, 1600, 1866 and 2133 MHz.
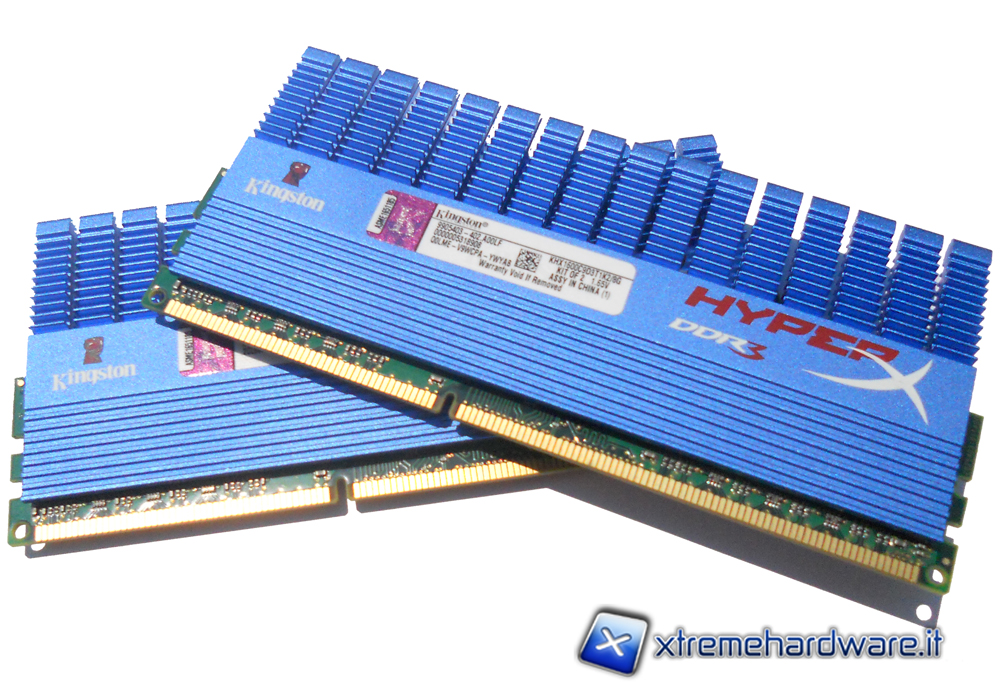
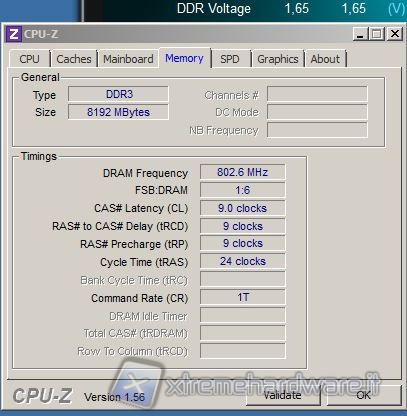
The modules we got for this review are a 2 x 4GB dual channel kit, with an operating frequency of 1600 MHz, 9-9-9-24 latencies and a rated voltage of 1.65 V.
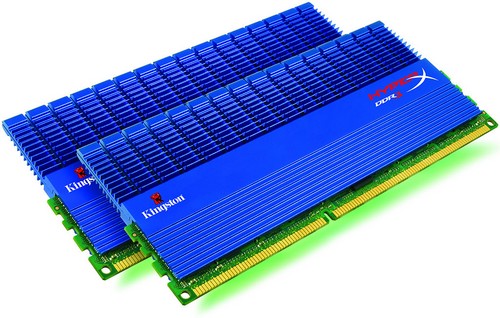
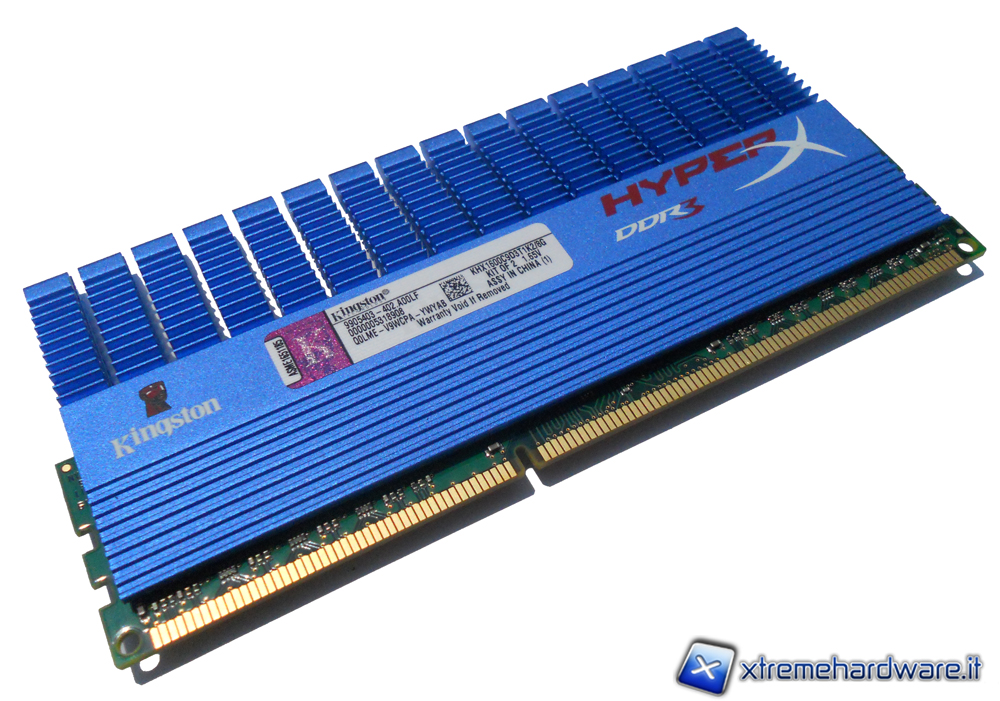
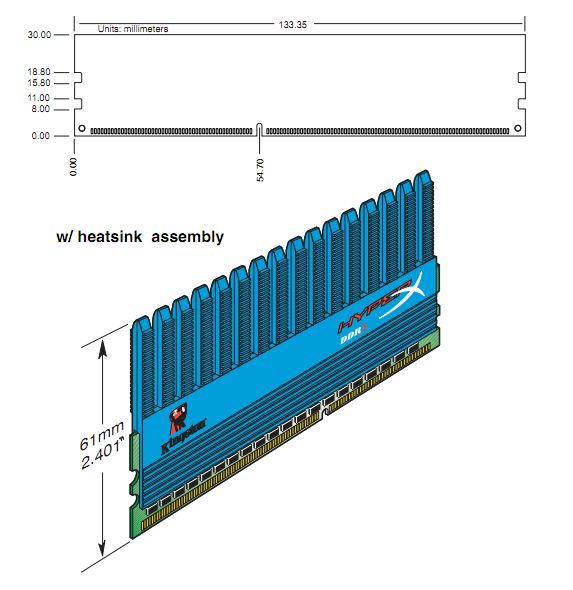
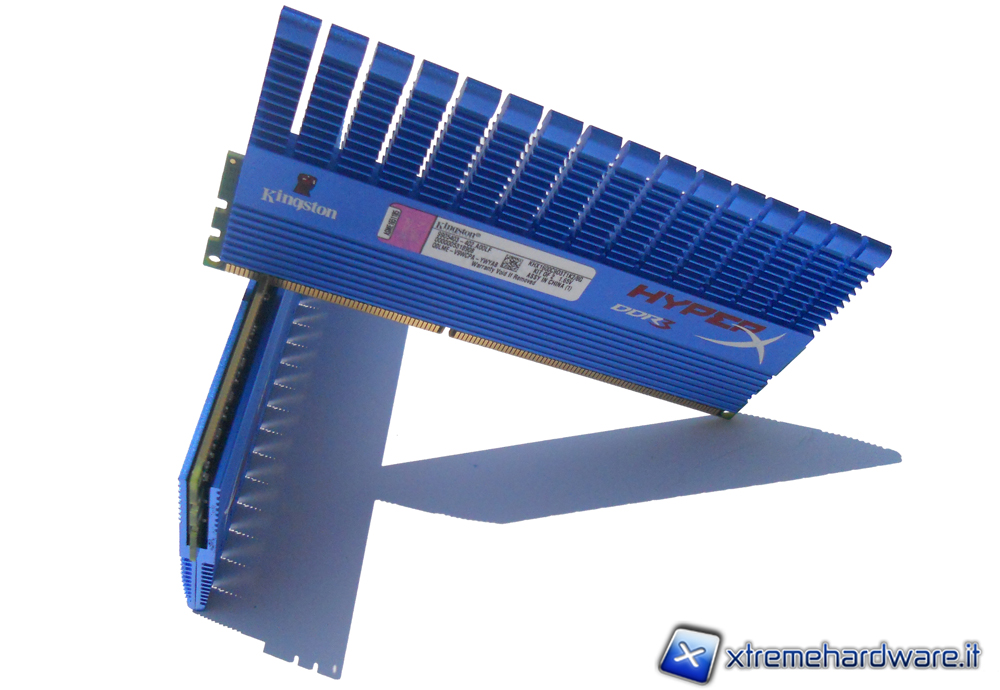
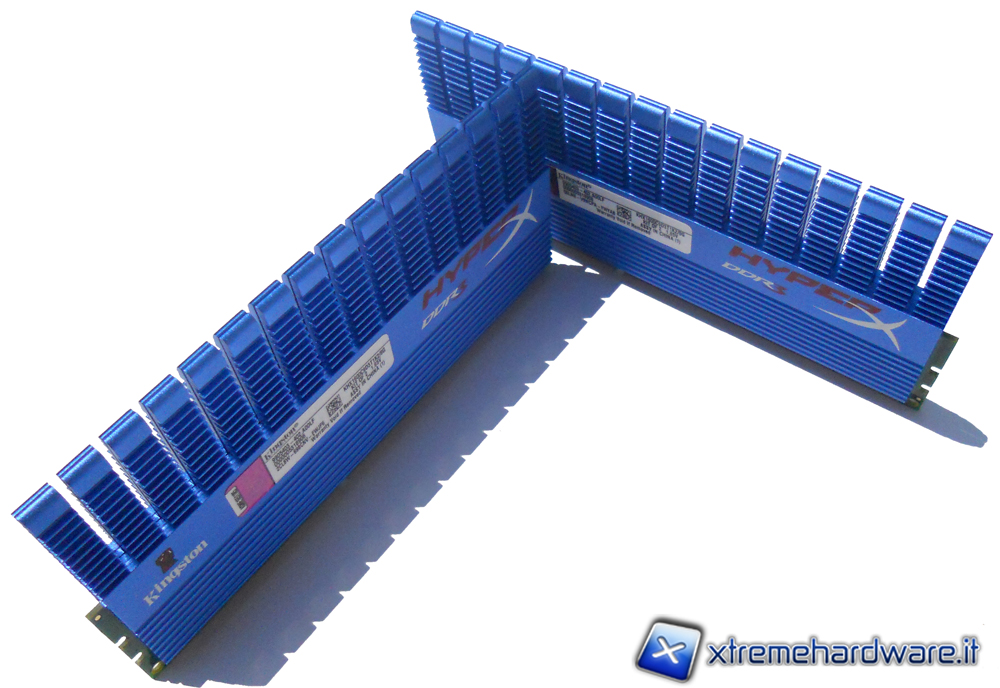
Also this kit, like all the the others belonging to the T1 family, has a very high blue anodized aluminum heatsink which, in some cases, could cause incompatibility with some CPU coolers. This cooler is well made and, unlike the classic heatsinks for medium or low value RAM modules, it is made from a single full block and not just from a pressed foil.Thus the RAM, even under stress, do not suffer from temperature problems and memory chips will be cooled efficiently.
The kit we reviewed does not have XMPs (Xtreme Memory Profiles) so you need to set the right frequency, timings and voltage in the bios prior to boot at the proper frequency.As we will see, the operating voltage, even if is set by default to 1.65 V, can easily be lowered below the maximum ratings suggested for Sandy Bridge platforms.
Technical specification
The technical specifications are shown in the following table:
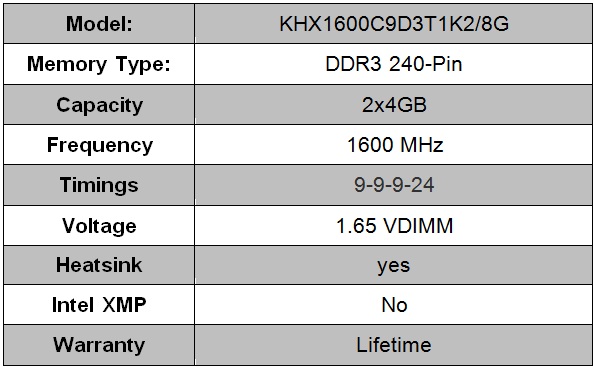
The absence of an XMP profile is also identified by the serial number of the model: models with XMP have an X at the end (eg. k2/8gX).
This kit offer lifetime warranty as well as other kits that we have previously reviewed.
Packaging & First Contact
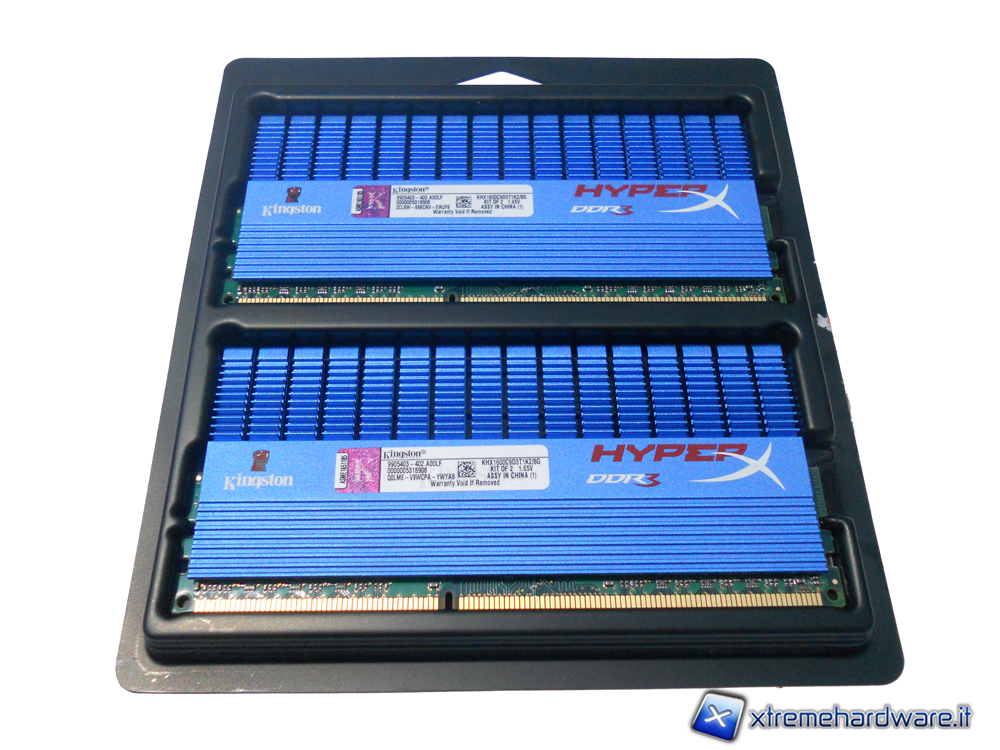
The HyperX T1 1600 MHz Kit is shipped in a blister transparent on one side, allowing us to have a look at the kit inside.
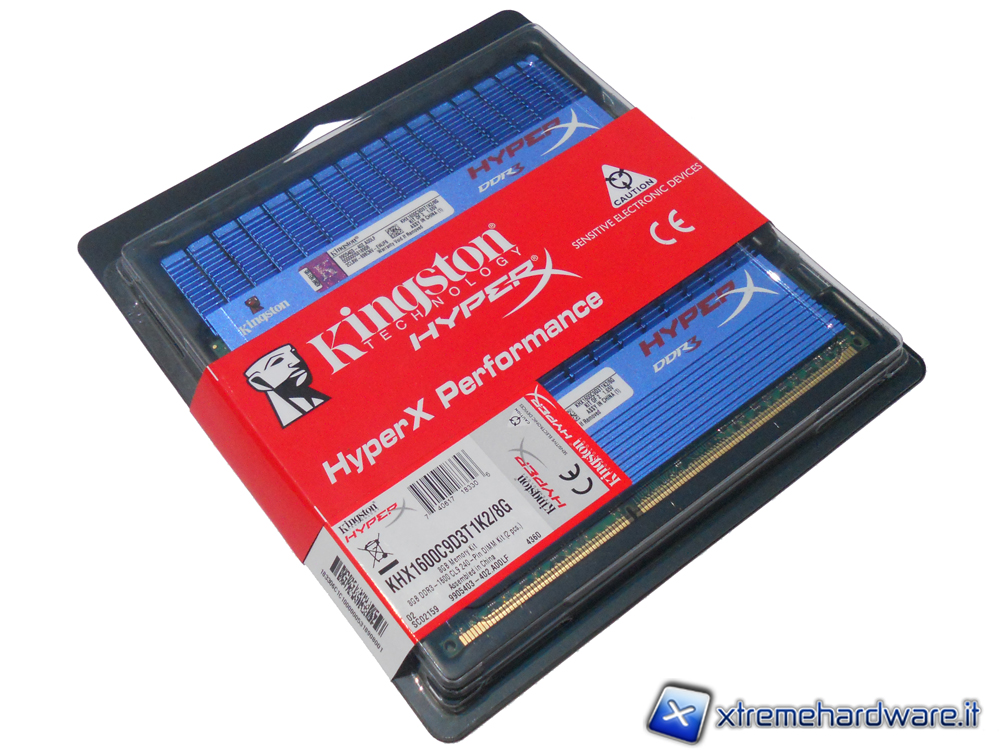
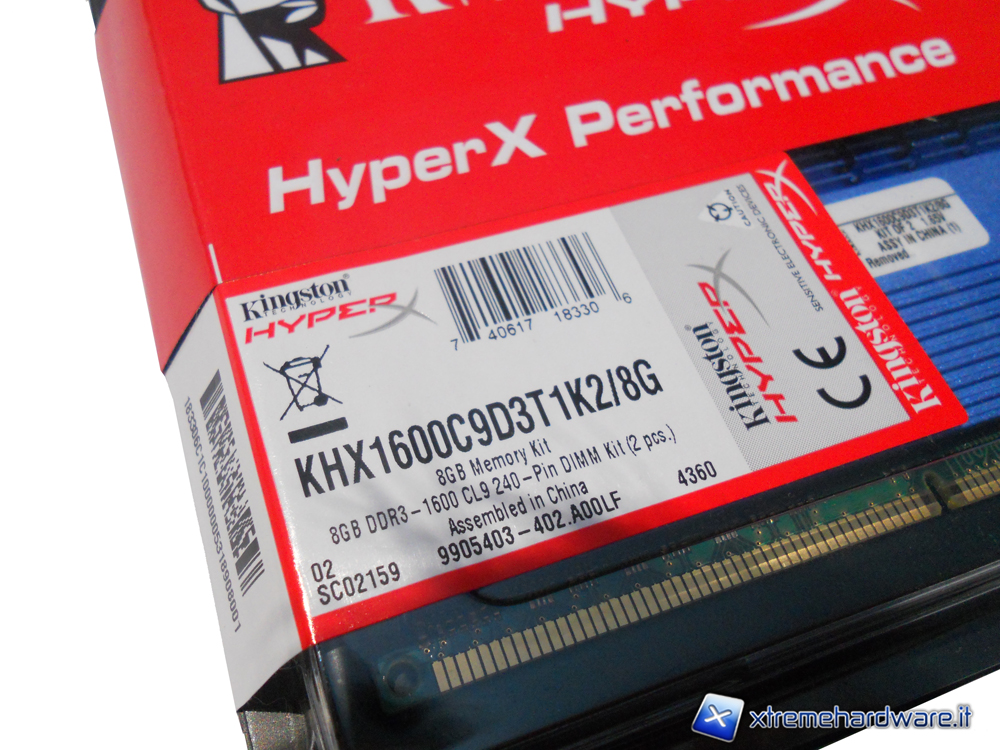
An adhesive, which contains all the information about the kit, has been used to close the blister. Namely it contains information about the product code, the capacity of the entire kit, frequency, latency and the number of modules.
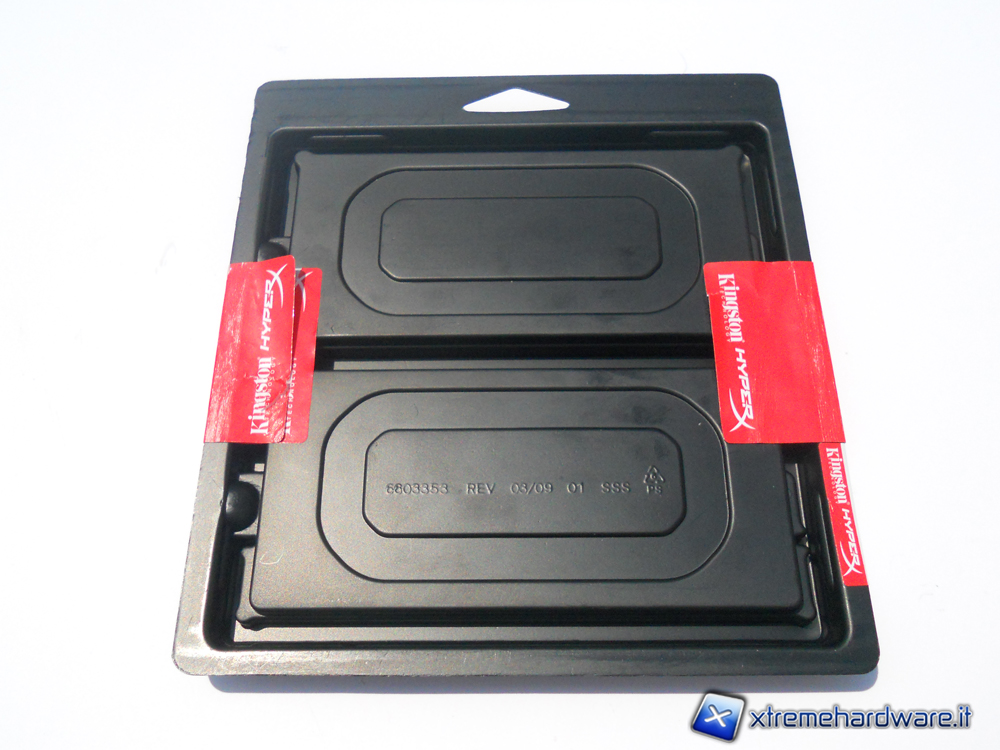
In the package, in addition to memories, there is a guide for installing the kit; between the various languages there is also Italian.
Once out of the box we can see the memories in all their splendor, the heatsink looks very solid to the touch and provides security from the outset. The green PCB of the memories is very different from the intense blue of the sink, however, once installed the module into the slot, it is difficult to see the PCB.
On one side of the heatsink there is the Kingston HyperX logo and the adhesive bearing specifications on the other side. In this case there not is the T1 moniker as it is for some modules of the series.
The cooling system used is very high and may cause installation problems if you use a CPU cooler from the fairly generous size.
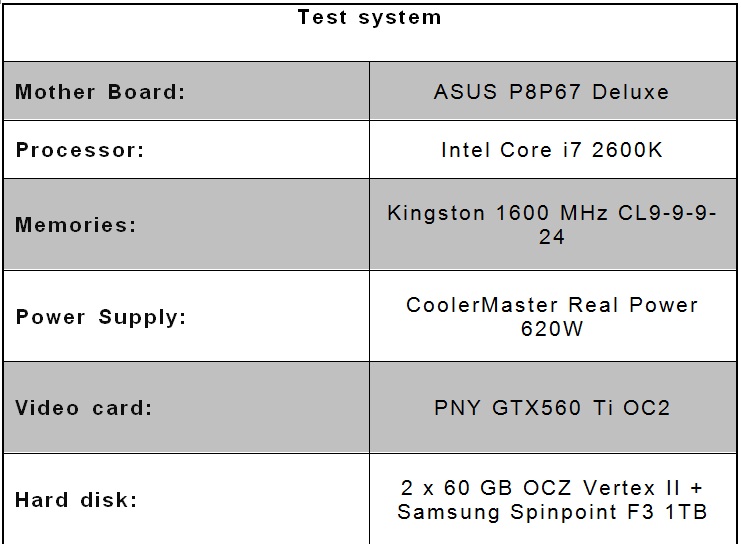
Test System and Test Methodology
For testing we used the following configuration:
We performed the tests by setting the base clock of our CPU to the default frequency (100 MHz), so we initially proceeded to perform our tests by simply editing the RAM divisors on our motherboard. We used the settings below indicated:
- 1333 MHz 7-7-7-18 timings
- 1600 MHz 8-8-8-20 timings
- 1600 MHz 9-9-9-24 timings
The CPU (i7 2600K) was not overclocked and its frequency has remained at default (3.4GHz), also we did not change the parameters of energy savings and those related to the Turbo Boost technology.
Finally, increasing the BCLK we managed to bring the RAM to 1660 MHz without changing the voltages and latencies compared to the default setting. In this case, however, the CPU frequency is increased to 3.95 GHz
It's important to note that the settings at 1333 MHz and 1600 MHz were stable even with voltages below the specifications, indeed, using these settings we were able to complete 10 cycles of Linx stress test using only 1.57 V. In addition, throughout the test session, it was not necessary to change the VCCIO voltage that was left then to 1.05 V. Recall that this setting refers to the voltage of the integrated memory controller.
As always, we remind you what we mean by access timing, whose values can be set by the BIOS of the motherboard:
- CasLatency Time (TCL): during a read operation, represents the time interval between the instant at which the read command arrives at a certain memory cell and the one at which the data transfer begin.The name is due to the fact that, to locate the memory cell, the column address is always the last selected (via the CAS signal), after the one relative to the line.
- RAS to CAS Delay Time (TRCD) is the interval of time between activation of row and column that identifies the memory cell in which you want to read or write the data, namely the delay between CAS signal and RAS signal.
- Ras Precharge Time (TRAS): represents the period of time when a certain line is active, before the coming of the precharge signal.
- RowPrecharge Timing (TRP): This BIOS setting specifies the minimum amount of time between two successive activations at the same DDR module. The shorter the interval, the faster the next bank of memory can be activated for read or write.
Performance Tests
Using the above settings, we found the performance using the tools listed below:
- 3DMark Vantage (performance mode, GPU1 and GPU2 tests)
- PC Mark Vantage x64 (memory tests only)
- Cinebench 11.5 x64
- Winrar4.00 Beta x64
- 7Zip 9.20 x64
- AIDA64 Xtreme Edition (read, write, copy, latency)
- X264 HD
To test the stability of the modules instead the LINX software has been used.
Synthetic tests
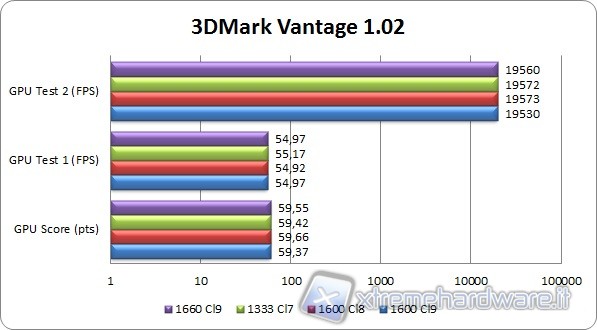
3DMark Vantage
The second-last born of the 3DMark series (of the Futuremark software house) highlights the processor performance especially in games, but in this case we have only carried out the tests on the GPU (2 tests). The results show that the best setting rate \ and the timings at 1600 MHz CL8.
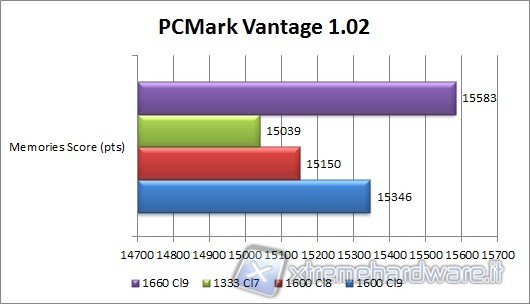
PCMark Vantage
In this case, however, the higher frequency meant that the score increased. Recall, however, that to set the memory at 1660 MHz we had to increase the frequency of the processor and the result is certainly influenced by this change.
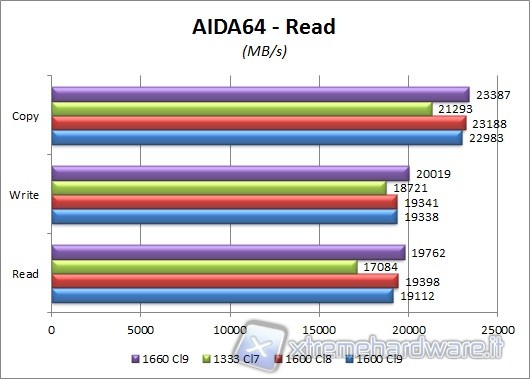
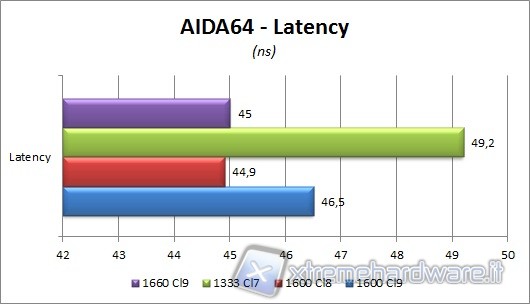
AIDA64 EXTREME ENGINEERING
AIDA64 is the latest release of the testing and control tool produced by FinalWire, the test in this case concerns the memory controller and RAM. The scores show how the setting at 1660 MHz results in superior performance compared to other settings, but again without overclock the best setting is to 1600 MHz CL8.
Data compression & Multimedia Test
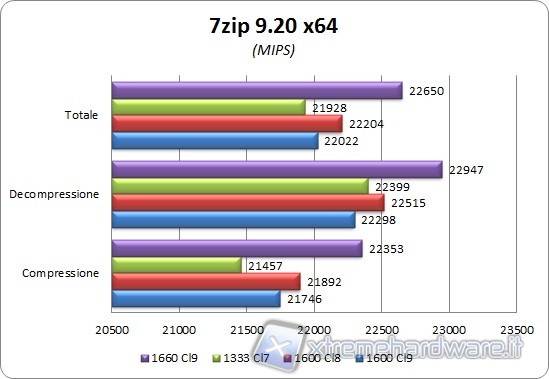
7zip 9.20
7zip is a great tool that allows compression and decompression of files. As in the previous test the best configuration without overclocking is that at 1600 MHz CL8.
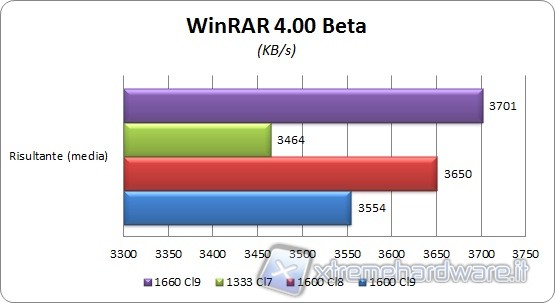
WINRAR 4 beta 6
Classic tools also dedicated to compression and decompression of files. Like the previous test the setting to 1660 MHz showed higher scores, followed by setting 1600 CL8.
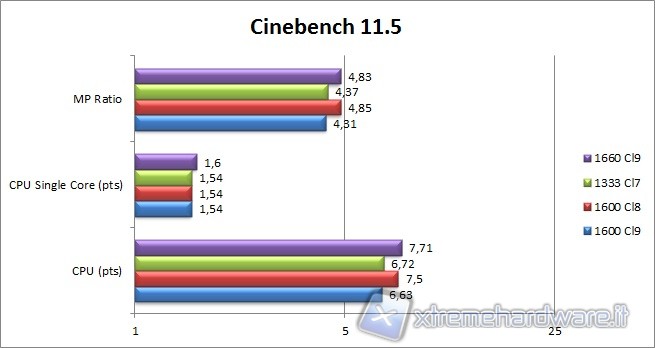
CINEBENCH 11.5
Maxton software dedicated to the movies production, Cinema 4D. The results are substantially equal, however, the best result was obtained at 1600 MHz CL8.
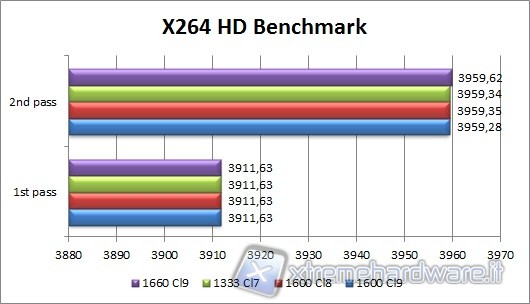
X264 HD BENCHMARK
Instrument that measures how quickly our system encodes a small movie in HD quality, this benchmark shows how accurately and efficiently (in Frames Per Second) can be the encoding.In this case we did not see any particular differences between the various settings.
Conclusions
The 8GB 1600 MHz Kingston HyperX Memory are perfectly suited for those who need a large amount of memory for rendering, encoding, etc.. However we were not satisfied with the overclocking performance of this kit, in fact, even with high timings, we were unable to reach the 1866 MHz frequency. However, we emphasize that despite the stated operating voltage of 1.65 V, the memories are stable even with lower voltages, below the limit recommended by the Sandy Bridge platforms (1.57 V).
The cooling system used is great, ensures very low temperatures and is finished in every detail; its size can still cause some installation problems with some CPU dissipation systems. Build quality is at the highest level and being derived from a full block is very durable.
In conclusion, the price of this kit is around € 90 quite in line with other kits of similar characteristics.Therefore we recommend this kit to anyone who is not willing to spend a lot of money for a kit of RAM, and seek high overclocking performance.
PROs
- Very stable even at 1.57 V
- Excellent cooling system
- Lifetime warranty
CONs
-
Declared voltage (1.65 V)
-
Performance in overclocking virtually inexistent
| Performance : | |
| Quality/Price ratio: | |
| Overall Rating : |
We thank Kingston for the product supplied to us for testing.
Giovanni Abbinante
Translated by Marco Comerci